
TensorFlow, creating the training set for object detection
TensorFlow is an excellent choice for training object detection models, that is, those models capable of telling you what objects are in an image and where they are. YOLO/Darknet is another choice, I wrote a few things about it here. To use TensorFlow for object detection, you need to build models with it, and the task needs the training set formatted the way in a certain way. This post will outline how to build it: it isn’t necessarily a trivial thing to do, not difficult but as for everything with TensorFlow, you need to do stuff the way it desires. Besides, there is no comprehensive documentation for this, so because I’ve done it for myself I thought I’d just share.
This will be assuming you have familiarity with what Deep Learning and object detection are and interested in using TensorFlow for a specific set of objects to detect in your images. Also, we’ll be using Python.
What is the training set here
Object detection in Deep Learning is the task of teaching the machine to tell you what’s in an image and where it is.
To use TensorFlow for the job, you need to refer to its models project. TensorFlow per se is a framework to build jobs, and the models repo contains models built on TensorFlow for specific tasks. In particular, if you head to research/ you’ll find object_detection, which is a bunch of scripts and helpers. It is research code, so not really a finalised software package. In fact, if you clone the repo you discover your linter will throw lots of red at it, to name one thing. The repo itself does not have great documentation, there’s a few READMEs so it really takes a quick and dirty approach, which is really good fun and makes you understand things from principles.
Without trying to understand what the code does or how to run a job, let’s cover the very first step, which is creating the training set to train a network to detect your objects of choice. TensorFlow wants this in a TFRecord format so we need to create that. According to docs “the TFRecord file format is a simple record-oriented binary format that many TensorFlow applications use for training data”.
1. Clone tensorflow/models and make it work
Better to work in a virtual environment. The object detection scripts need you do a few installations:
pip install Cython
pip install contextlib2
pip install pillow
pip install lxml
pip install jupyter
pip install matplotlib
After this, clone the TensorFlow models repo.
2. Append to PYTHONPATH
To run the scripts inside object_detection, you need to add the path to it to your PYTHONPATH env var. This is because the folder isn’t installed as a package, and scripts within it will call from it, so you have to make Python find the methods that need imported. After you’ve added to PYTHONPATH, it’ll all work if in a shell you can run a from object_detection import *
3. Create a labelled set of images
You’d typically leverage transfer learning by making use of a pre-trained network and customising the last layers to adapt to your set of images, learning to detect the specific objects you want. So you first need to create a set of labelled images where you manually draw the bounding boxes around the objects of choice.
One tool that you can use for annotation is labelImg. It’s quite neat, and comes about in many of the blog posts of people that have done the same thing. It basically gives you a clean UI: you point it to a directory of images and then can tag each one, drawing bounding boxes around objects.
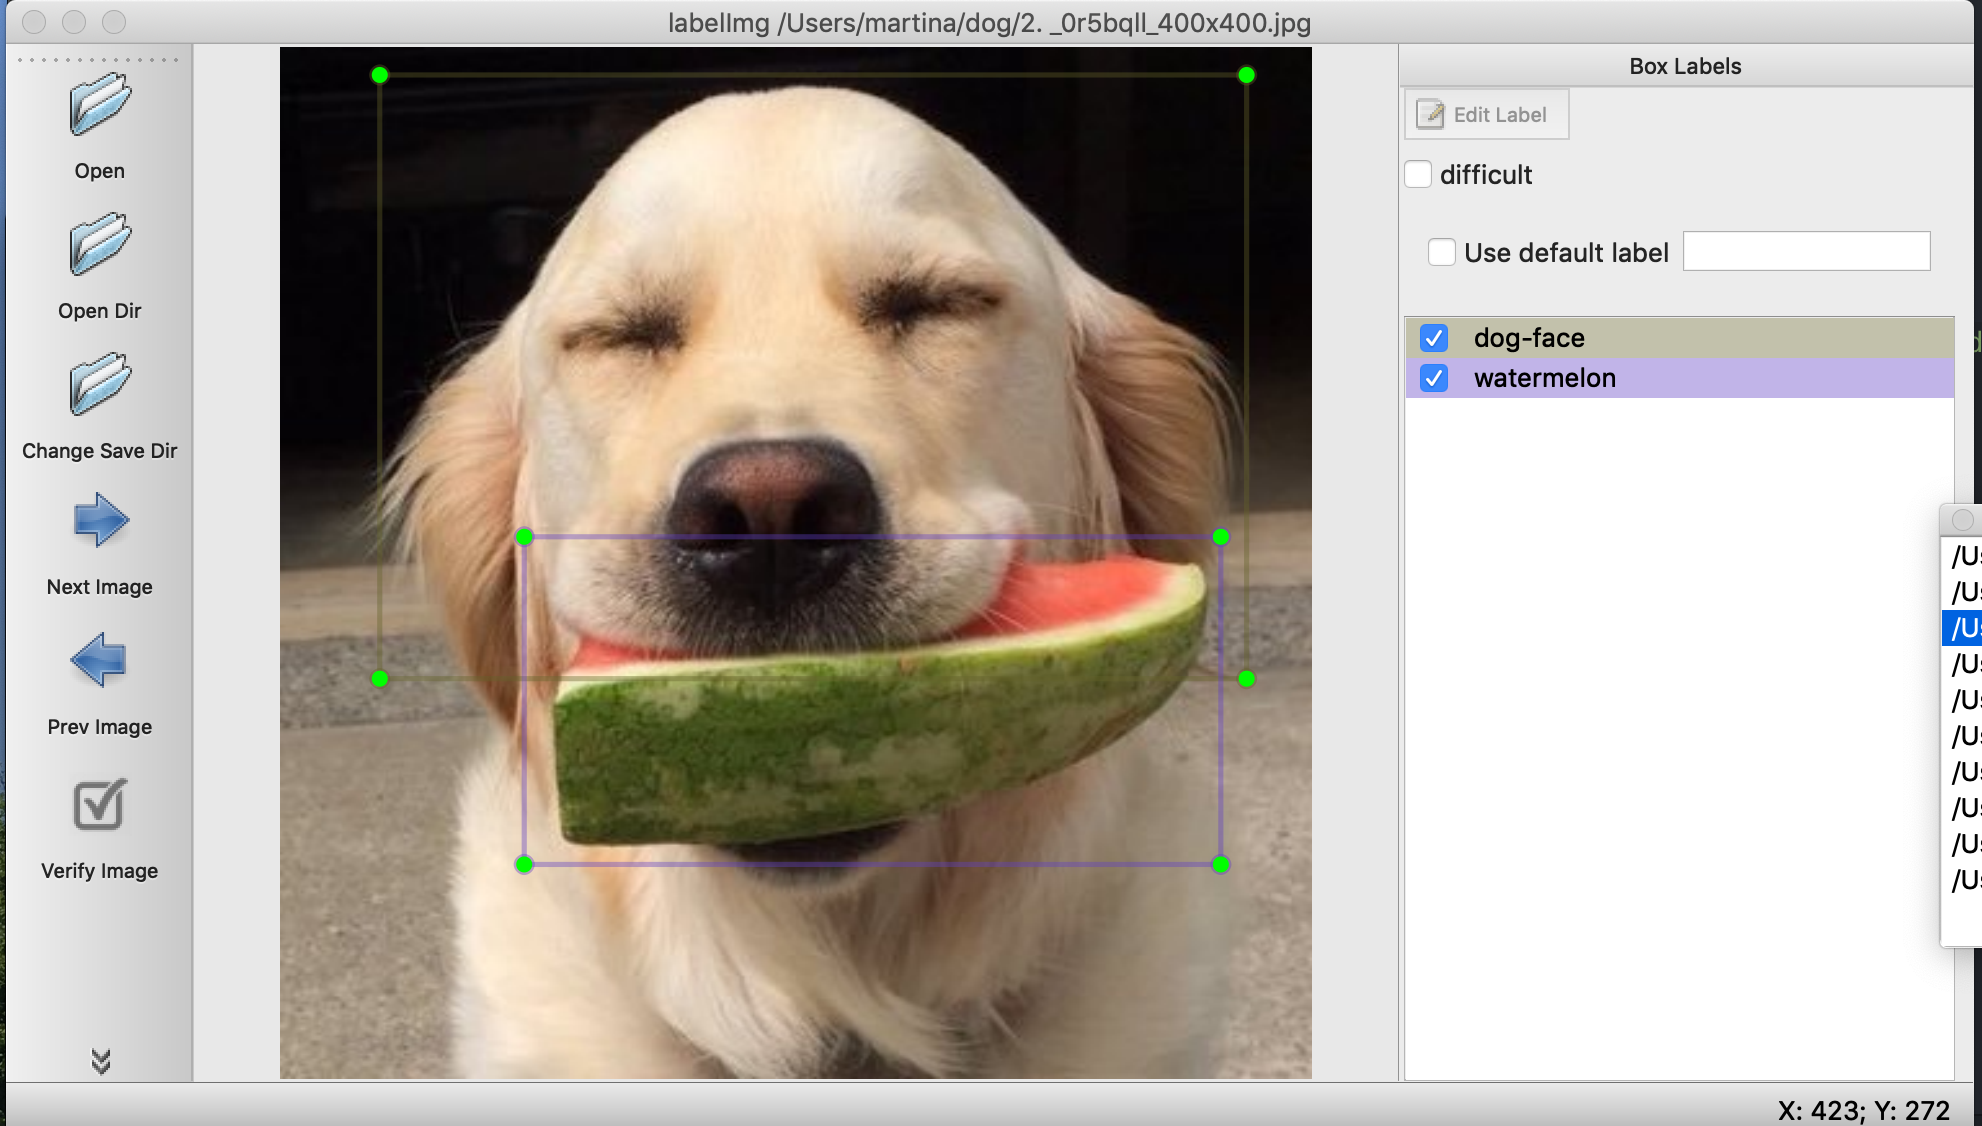
The screenshot above was me trying to annotate for dog faces and watermelons. To get there, it is as simple as clonig the repo, following some dependencies installations that you find in the README, cding into folder and then firing it in a terminal as
python labelImg.py
You point it to a directory where you stored images and start labelling. If you read the README there’s keyboard shortcuts that are super useful as in a typical case you’d have to annotate hundreds of images.
The tool will spit files in XML format in an output directory, these files contain, at their core, information over the bounding boxes you’ve drawn around the desired object, in format
<xmin>87</xmin>
<ymin>148</ymin>
<xmax>266</xmax>
<ymax>347</ymax>
3. Convert XML files to CSV, separate train and test sets
You’d need to separate the XML files into those for training and those for testing, before running the training job, so that eventually you’d have TFRecord files for each. TFRecord sets are conveniently made from CSVs with a routine, so first you need to pass from XMLs to CSVs.
To do that, you can write your own script or make use of Dat Tran’s one which works like a charm and save some time. You’ll end up with a Pandas DataFrame with the numerical information each in its own column, which you can spit to CSV. Essentially the script parses all files in the path you point it to and builds the dataframe filling in columns with those numerical values shown above.
After this, one way to obtain train and test sets is to use sklearn, just because again it saves you time:
from sklearn.model_selection import train_test_split

train_df, test_df = train_test_split(xml_df, test_size=0.2)
You’d want to spit those two CSVs to file now as they will be the input for creating TFRecord sets:
train_df.to_csv('train.csv', index=False)
test_df.to_csv('test.csv', index=False)
4. Convert CSVs to TFRecord
At this point, all is left to do is convert those CSVs to TFRecord format. Dat Tran has also created a script for this, which uses utils in tensorflow/models to do the actual conversion. Again, it’s a matter of saving time. Script is here. The script needs customised to the object names you have, but other that that it’s ready for use.
You’d run it as (for the training CSV)
python generate_tfrecord.py --csv_input=train.csv --output_path=train.record
And do the same for the testing CSV. At this point, you have the sets in the format required and you’re done for this!
What other people wrote and did
There is lots of people having gone through the same process or contributed code. Just mentioning a few, whose material I’ve used:
- The TensorFlow models repo
- labelImg for annotating your images
- Dat Tran’s famous post on training a racoon object detector
- Dat Tran’s repo with the code he uses in the post and that we perused here